 This page is now considered outdated as the information has not been updated in sometime and is no longer relevant to the current Davis systems. This page has been left as a reference page in our ‘Legacy’ section.
Records of daily weather conditions have been kept for 200 years and more, of course, but traditionally have always required a diligent and dedicated human observer to record readings from manual instruments at a fixed time, without fail, every single day. And to analyse the daily data collected over months and years, more painstaking paperwork was called for.
 But fortunately we’re now in an era where continuous automatic collection of weather data is feasible. And what’s really made a difference in the last few years is that the technology to make accurate automated measurements has become much more affordable and more straightforward to use. We’ve now reached the point where it is well within the budget and capability of many individuals, clubs and businesses to run their own automatic weather station (AWS) .
The key benefits of automated measurements include:
- All current weather readings can be seen from indoors, at a glance and at any time;
- Routine daily maintenance chores (eg emptying the rain gauge) are done automatically;
- AWS stations can automatically record maximum and minimum values for a range of weather parameters through each day and keep track, for example, of total monthly and yearly rainfall;
- Readings can be easily taken direct from the console display;
- A data logger and PC can be readily linked to the station so that all weather data is automatically logged. This means that;
- Automated systems can run for weeks and months without attention whilst continuously recording all details of the weather;
- Much greater within-day detail is available eg the complete pattern of wind speed & direction through the day can be logged;
- Comprehensive statistics can be automatically calculated and analysed;
- Impressive visual graphics can be displayed;
- Detailed weather conditions may be viewed at any distance from the station itself, for example over the Internet;
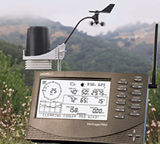
The component parts of an Automatic Weather Station
In overall terms, an AWS system – as pictured above right – typically consists of:
- A set of sensors mounted outdoors to measure the various weather parameters;
- A console unit, usually located indoors, to collate and display the weather readings;
- Optionally, a data logger to link the system to a PC;
The number and type of outside sensors will obviously vary with the purpose and sophistication of the AWS system, but sensors for some or all of the following weather readings may be fitted:
- Anemometer for wind speed and direction;
- Air Temperature;
- Rainfall gauge;
- Humidity;
- Barometric pressure (usually measured by a sensor indoors);
The temperature and humidity sensors are typically housed within a white louvred ‘radiation shield’ (to prevent direct sunshine heating up the sensor elements and leading to errors) – see the lower left of picture, which also shows a black conical rain gauge; and anemometer at top right.
A more advanced station might also be able to measure:
- Sunshine and UV intensity levels;
- Additional temperature and humidity levels;
- Parameters of interest in agriculture such as soil moisture and leaf wetness;
The outside sensors will be connected back to the console (normally located indoors) in one of two ways: via cables or via a short-range wireless link.
Considerations when choosing and setting up an AWS
Budget will obviously be one important factor, but three other key considerations to help get your deliberations started are:
Which sensors?
The first step is to decide which sensors you would like to see in a station, remembering that typically the fascination with weather monitoring grows and the value of the readings is increasingly appreciated after a new station is installed. So whatever sensor specification you choose initially, it may be sensible to choose a station model that offers the option of adding more sensors later.
All Davis stations offer measurements of at least wind speed and direction plus air temperature. The Vantage Vue and standard VP2 stations add rainfall, humidity and pressure readings to these basic three measurements. The Vue offers exceptional value for money for a wireless station with its pedigree and features, provided you’re happy with all the sensors being mounted in one unit, while the wireless VP2 models are especially flexible in being able to accept a wide variety of additional sensors.
Some users may have a requirement for further special sensors on their station. For example, you may wish to monitor sunshine and/or UV intensity, or temperature and/or humidity values in additional locations. If you’re involved in gardening or agriculture you may wish to make measurements of soil moisture or leaf wetness. Again, for maximum expandability the wireless VP2 stations will be of most interest.
Do you wish to add a data logger for linking the weather station to a PC? This is now a commonly-requested accessory because of how much power and flexibility it adds to ways in which all your weather data can be stored, analysed and presented, while still being relatively simple to use. Do you have any special data handling requirements, for example to run a live weather reporting website on the Internet, for the benefit of your local community, for members of an outdoor sports or activity club, or for particular business reasons? Do you need to be able to view and analyse the weather data at some distance (maybe 100 yards, maybe many miles) from the station location? Adding a data logger link to a PC is the key to enabling all of these data-based features.
Adding the Weatherlink data logger to a standard Davis station is straightforward. But for more complex installations, for example involving measurement of additional environmental parameters and/or transfer of the data over longer ranges, the technical details of data transfer and of where sensors are placed can involve more detailed discussions. Fortunately, our extensive knowledge of linking weather stations to PCs is usually enough to find an answer to most queries and we have also found that the majority of our customers are able to find out everything they need to know via emails or phone calls – a site visit is usually unnecessary, saving you time and money. So whether your interest is in a standard station or something more demanding, please do contact us to discuss your project and take advantage of our expert advice.
Which make?
Once you’ve decided on an outline specification for the system, the next step is to choose the best make and model for your needs. Visitors to this site are typically looking for a station providing good accuracy and reliability, but at a price that won’t break the bank. Davis stations have a proven track record for quality and accuracy and are the market leaders worldwide in this sector. The Davis stations are made in California by a specialist weather-based company offering solid after-sales support, and are not to be confused with cheap gadgets mass-produced in an anonymous Far East factory and sold with minimal support.
Siting the outside sensors
The last general point to consider is how and where the outside sensors will be installed. To obtain accurate weather readings it is vital that the outside sensors are mounted with good exposure to the weather parameters being measured. This important topic is covered in detail in its own section, but here is a brief summary of the main recommendations:
- The anemometer (for measuring wind speed and direction) needs to be mounted high in the air to catch the maximum wind speeds. Typically, it should be mounted on a pole and projecting 2-3m above the apex of a roof for best results;
- Air temperature can vary with height above the ground under certain weather conditions and therefore a standard height for measuring air temperature has been set at 4 feet above the ground. The air temperature sensor should be mounted in an open space to allow good air circulation and over natural ground (ie not concrete or asphalt). If a protective radiation shield is not available, the temperature sensor must be mounted in the shade for accurate results;
- The rain gauge similarly needs to have an open exposure, with no nearby trees or buildings that might limit the amount of rain that can fall freely into the gauge. The rain gauge is better sited close to ground level (eg at the same 4 feet height as for temperature). Mounting this gauge high in the air can cause significant errors due to wind effects;
Read More
- Go direct to the Products section;
- Detailed suggestions for siting outside sensors;
- Linking the weather station to a PC via a data logger;
- Creating a live weather reporting website;
- Additional data handling topics;