What is Meteo-Pi?
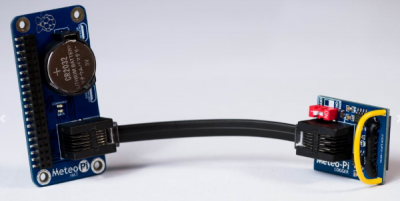 Meteo-Pi is a low-cost, two-part cabled adapter linking a standard Davis weather station console (VP2, Envoy or Vue) to a Raspberry Pi computer. The two parts are: a console interface that fits into the console much like a traditional logger and a Raspberry Pi input adapter in the form of a microHAT (µHAT), which means that it plugs directly on to the interface pins of the Pi. The two parts are joined by a short, Davis-compatible cable with RJ11 connectors.
More product details of Meteo-Pi can be found on its product page.
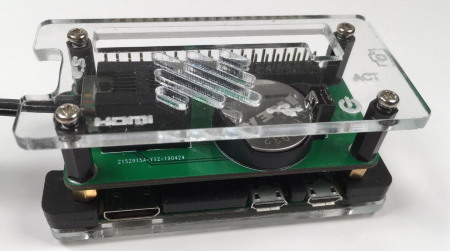 The image right shows the HAT installed on to a Raspberry Pi Zero WH and placed in a (slightly modified) case for neatness. This case is just 3″ (75mm) long – in other words, it is very small
If used with WiFi as the network connection makes for a very neat installation with just console and Meteo Pi assembly as the only parts required for a full dedicated weather computer..
Where Meteo-Pi fits in
Connecting a Davis station to a computer adds hugely to the data storage, analysis and Internet publishing features that are possible. Traditionally, the linked computer was a full-sized Windows desktop or laptop. And if you want continuous, real-time data handling this calls for the computer to be dedicated and running 24/7, which can be costly both to purchase and to run.
One recently-introduced alternative approach is the combined logger + Single Board Computer (SBC) class of devices such as the WiFi Logger and the Meteobridge range. These are both excellent devices and will be a great solution for some users. But both are also significantly limited by their available computing power and memory, plus the fact that there can obviously be no option but to use the built-in firmware/software – if you’re not getting on with the features or interface or wish you had more power or memory, you can’t just switch to an alternative program with a combined logger/SBC.
Meteo-Pi works around these various limitations by moving all the data processing on to a Raspberry Pi computer, which confers four main benefits:
- A Pi computer is very inexpensive to buy and also to run – it consumes minimal electrical power and can be left running 24/7 without any concern. Pi devices are also relatively tiny and so can be located inconspicuously;
- Despite their small size, Pi computers are surprisingly powerful as a dedicated weather computer, especially so if one of the more powerful Pi versions such as 3B+ or 4 is chosen;
- The choice of weather station software is entirely up to the user. If one program doesn’t live up to your expectations then switch to another. Obviously any program must be compatible with a Pi, but there are already several suitable programs available, including some free ones, and we expect more to launch in the future;
- Pi computers either have WiFi onboard already or can be easily WiFi-enabled with a tiny USB dongle. All that’s needed therefore by way of set-up is a Pi connected to the VP2/Vue console via Meteo-Pi. All further network and Internet connectivity can be via WiFi.
Perhaps the main challenge in switching to a Pi-based weather computer is that Pi’s typically run a version of Linux as the operating system. There is certainly something of a learning curve to making the switch, but it is gentler than some might imagine, as further parts of this blog post will describe by setting up a Meteo-Pi unit in conjunction with a Raspberry Pi Zero WH unit and CumulusMX software.
What’s involved in using a Raspberry Pi?
Most people will have heard of Raspberry Pi computers by now, but if you’ve never used one before a few basic background notes follow below. One great advantage of using a Raspberry Pi is that many millions of these devices are in use around the world and there is extensive information and support on these devices available on the Internet. Documentation available on the website of the Raspberry Pi Foundation is an excellent place to start. But there is a considerable amount of additional material and videos available as well as any search of Google or YouTube will reveal.
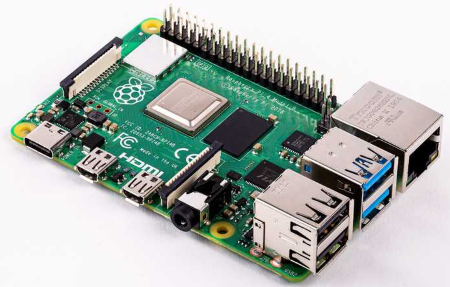
The first general point is that Raspberry Pi computers are – as indicated above – miniature computers, with their circuit boards no more than 3-4″ (75-100mm) long. So a complete Pi computer occupies a minimal amount of space.
Pi computers are not usually sold as a complete computer (ie complete with case, power supply etc) – see image right of a Pi as supplied. Rather, the Pi itself is the main circuit board, containing all the key components necessary for the computer to function, but accessories such as mains adapter, SD card, case, keyboard, mouse, monitor etc need to be purchased separately. Actually, how many of these accessories you might need does depend on how the Pi is set up and – as explained below – it’s perfectly possible to run a Pi with only mains adapter and SD card added (though a £5 case is recommended for neatness).
It’s worth adding that the Pi is designed as a low cost system and almost all accessories are also available relatively cheaply (eg mains adapter £6, case £5 etc), so even if you do decide to add some extra accessories it should still all be possible on a limited budget. There is also a cut-down, basic version of the Pi called Pi Zero (see below), which is nonetheless still adequately powerful to run weather station software. And the Pi Zero WH version used in this article costs just £13. And a further low/zero cost aspect is that the Raspbian operating system is downloadable at no cost (or you can buy it pre-installed on an SD card, which costs something but still fairly minimal).
For its size, a Raspberry Pi is surprisingly powerful and is perfectly capable of running full weather station software like CumulusMX or weewx, maintaining full weather records and uploading data to weather networks like Weather Underground and to your own website. The Pi is available in several versions as summarised above. Power consumption is also tiny and there is no problem leaving the Pi to run 24/7 for extended periods without any routine attention. Unlike modern Windows PCs, Pi computers do not need or expect frequent automatic updates and so there are no issues like unexpected reboots.
A Raspberry Pi usually runs an operating system called Raspbian, which is a version of Linux. This is probably the biggest difference between the Pi and more familiar Windows computers. So yes you do need to learn a little of the basics of running Linux and this is the main hurdle that Pi users need to overcome – it is different from Windows and does require a little time and effort to make the transition to running Raspbian. If you’re seriously allergic to computers then using a Pi or Meteo-Pi may not be for you. However, with a little familiarisation, using a Pi is genuinely straightforward and, beyond a few basics which are available as step-by-step instructions, there is not too much to do by way of configuration.
In the context of Meteo-Pi, you’re not going to be using a Pi as your main computer, but rather as a dedicated weather station computer running only the weather program. So all you need to know is how to set up the Pi and launch your preferred weather program, such as CumulusMX. From then on, you’ll be making any adjustments to the weather program itself and not to the Raspbian operating system. Linux systems such as the Pi tend to run for extended periods without any of the need for periodic updates and reboots that are needed by Windows and so the Meteo-Pi should just tick away in the background for extended periods leaving you to focus solely on the weather data.
Raspberry Pi options
Raspberry Pi computers come of course in a number of versions. We have tested Meteo-Pi with the Raspberry Pi 3B+, 4B and Zero W versions. In all probability it will work with other and older versions too, but these are untested as yet, The three current versions that we would recommend considering are:
- Pi 3B+: Until recently, the standard ‘full-sized’ Pi version, but still a current version and perhaps more familiar as yet than the 4B. The 3B+ is substantially more powerful than the Zero version, giving plenty of performance margin for weather station software, though it is still low-power of course in electrical power consumption;
- Pi 4B: The latest high-performance version of the Pi giving still more computing power. The Pi 4B also is the first Pi with USB3 compatibility making it easier to connect high-speed data storage to the Pi using an external hard drive;
- Pi Zero W:
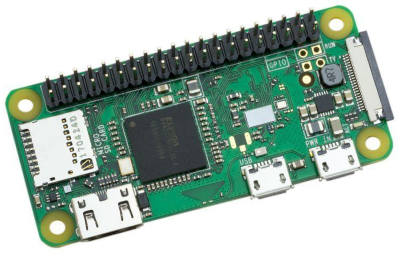 This is the smallest version of the Pi and also the version with the lowest power consumption. There is a bit more to say about the Zero than the 3B+ or 4B: The Pi Zero has less computing power than other current versions such as the 3B+ and 4B, but nonetheless is powerful enough to run most weather station software without breaking sweat. The other key advantage of the Zero is its small physical size. Meteo-Pi is designed to complement the Pi Zero exactly and the combination of Meteo-Pi and Pi Zero makes a surprisingly neat and tiny solution (see image right – around 80mm long) to meet all data handling requirements for a Davis station. If you do plan to use a Pi Zero then remember that you will probably need the Pi Zero WH version, which has WiFi onboard and the 40-pin header factory-fitted – it is important to seek out this version. The WH costs a little more than the plain Zero or Zero W but saves the pain of needing to solder on the header for yourself. (NB Full-sized Pi versions like the 3 and 4 have the header fitted as standard.) Note that the Zero WH only communicates to a network via WiFi. If you prefer the stability of a cabled network connection then it’s better to choose a Pi 3 or Pi 4;
Please remember that if you plan to place your Pi in a case – which is recommended because it gives a neater overall result – then you will need a case with sufficient spare height to accommodate the Meteo-Pi HAT. A case with a transparent top is also a good idea so that you can see the LEDs on the Meteo-Pi µHAT.
Buying a Pi: Most countries now have reputable Pi suppliers, including sources like Amazon, Element14 etc. In the UK, ThePiHut is one well-known supplier.
Pi configuration comments
Normal vs ‘headless’ operation
Pi computers can be set up in two distinct ways: First, you can obviously connect a keyboard, mouse, screen etc to the Pi and use it similarly to a conventional Windows computer.
But the other option is to run the Pi in what’s called a ‘headless’ configuration. This means not having anything attached to the Pi other than the console connection and a power cable (and optionally – if WiFi is not available – a network cable), and controlling the Pi and viewing the data from another computer on your network. This is surprisingly easy to do with a Pi and for many users will be the preferred configuration because the only device that needs to be nearby to the Davis console is the Meteo-Pi unit itself. (Actually, you can run ‘headless’ with most modern computers, but it is much commoner and simpler to do so with Linux computers such as the Pi.)
If this is your first time using a Linux computer or Pi then you may understandably be tempted to run the Pi conventionally, ie with keyboard, mouse and monitor attached, at least to start with. That’s all fine though it obviously requires a spare monitor with HDMI connection. All we would underline is that it really is not much more difficult to run headless and the instructions in Part 2 will cover headless running.
SD Cards
One major difference of Pi computers from eg Windows machines is that, by default, all of the Pi’s operating system and data storage is placed on a single micro SD card. There are ways of changing this behaviour by configuring storage on USB sticks or USB-attached disk drives (the Pi 4 model makes this more attractive by providing a USB3 port for high-speed USB), but for present purposes we’ll assume use of the standard SD card.
A key consequence of using the SD card for all storage is that everything about a default Pi is contained on its SD card. In other words, the identity of the Pi hardware can be changed completely by loading a different SD card. Another corollary is that preparing a Pi for routine use is largely about preparing its SD card, which is often conveniently done on a different computer such as a Windows laptop fitted with an SD card reader. It is easily possible to start with a blank SD card and to install and configure the operating system yourself or, if preferred, you can buy an SD card with the OS already installed (though you will always want to run an update at first use to ensure that the OS is fully up to date.
Choosing the optimum SD card is an important topic in itself. Like most storage media, SD cards do not last forever and data backup (which can easily be achieved from a Pi via WiFi to some other local or cloud storage) is important, as indeed it is for all types of computer. Cheap. poor-quality SD cards do not perform or last well and it is worth seeking out premium quality cards. Even though a Pi computer is low cost in general, don’t be a cheapskate on the SD card. (Of course, if you buy an SD card with the OS already installed then you’ll be relying on the supplier having made a good choice of card.) But if you are preparing your own SD cards then three guidelines would be:
- Choose a card described as Long or High Endurance. If it’s possible to find details of the memory used in the cards then try to find cards that use MLC and not cheaper TLC memory. (SLC would be ideal, but likely to be prohibitively expensive.);
- High speed cards are not necessary for use with a Pi. High speed is great for use in digital cameras, but Pi use needs endurance and not extreme speed. An expensive extra high speed SD card will not yield any benefits in a Pi weather computer;
- Buy as large a capacity SD card as can reasonably be afforded. 16GB is the smallest readily usable on a Pi, but 32GB is better. 64GB or 128GB would be better still but the latter may be unnecessarily expensive in a high endurance card.
Terminal vs GUI operation
Raspberry Pi computers effectively have two modes of operation, which are in principle not unlike older Windows computers though much more widely used than was the case with Windows. There is a text-only Terminal or command-line mode, resembling the DOS mode in older generations of Windows and then a full graphical user interface (GUI) akin to the familiar way in which Windows operates.
The point here is not to go into great detail about how the operating system works, but simply to make a few comments by way of orientation in how Meteo-Pi can work:
- Pi users can run either Terminal or GUI modes, though it’s common to use the terminal text mode for much of the basic configuration;
- Both Terminal and GUI modes can be used to access the Pi from other computers in the network (though the two approaches are accessed rather differently);
- Some weather station software such as CumulusMX can be completely managed on the Pi via text commands in Terminal mode and yet will provide a full graphical display on another computer on the network. Again, the point here is not to go into technical detail but simply to be prepared for the fact that weather programs may run rather differently from the normal convention on Windows PCs. In no way are they difficult to use, especially after a little familiarisation, but simply a little different!
Setting up a Meteo-Pi (part 2)
With the background above, we can now move on to more detailed instructions in Part 2 of setting up a new Meteo-Pi