 The LeWL Windlogger is designed primarily with one specific application in mind: long-term logging of wind speed and direction data. As a result, its purpose is different from the AWS systems described in other pages on this site, which are typically used for real-time display of weather data or for relatively frequent data uploads to linked PCs.
The LeWL Windlogger, in contrast, is essentially an offline only device; the logger itself is installed outside at the survey site and its data only accessed when its memory card is detached from the logger and inserted into a PC, which might be scheduled to be done on eg a monthly basis (or indeed less frequently).
The LeWL Windlogger is an ideal and highly cost-effective solution where a requirement exists for unattended logging of wind data over a period of months and years, most typically when surveying a site for possible wind turbine installation.
LeWL Windlogger prices
Logger + 6410 anemometer = £530
Logger + 2 x 6410 units = £680
Prices include VAT – see prices page
In essence, the LeWL logging system consists of just two components:
- An anemometer for registering wind speed and direction;
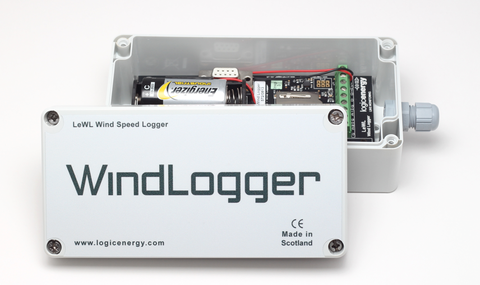
- The LeWL Windlogger itself, which is a compact (185 x 80 mm), standalone and fully weatherproofed box to which the anemometer is attached by cable;
Any compatible anemometer may be used with the LeWL Windlogger but we recommend using a Davis 6410 anemometer to provide the optimum balance between performance and affordability. This anemometer also provides readings of both speed and direction. The Davis 6410 model is the anemometer supplied with our LeWL bundles.
Key features
- Data storage
- Data are logged to an internal SD memory card, which acts as a transportable storage medium.
- The logger supports SD cards up to 2GB in capacity, which provides a huge amount of storage for wind data, suficient for several years of data at a 10-min logging interval;
- Option of logging wind speed at 10 sec or 1 min or 10 min intervals. Mean speed over the interval, max gust speed and mean direction are all logged at each interval;
- Data are logged into a simple CSV file with one file per day (10 sec interval) or one file per month (1 or 10 min intervals). The CSV file allows easy import into any spreadsheet program once the SD card is inserted into a PC;
- It’s worth underlining that the LeWL Windlogger is intrinsically weatherproof, which makes installation at the measurement site very straightforward – no separate arrangements need to be made to mount the logger in its own weatherproof container if no building or shelter is otherwise available;
- Very low power consumption – 2 x ‘C’ cell batteries give one year’s uninterrupted operation when logging data at 1min interval from a single anemometer;
- Other features:
- Option to connect two anemometers to one LeWL logger, allowing logging of wind speed at eg two different heights. (NB This will reduce battery life);
- Circuit contains a real-time clock chip to time-stamp each logged value;
- RS232 compatible for reading values while logging;
- Circuit also contains a temperature sensor allowing approximate temperatures to be logged alongside wind data;
- The LeWL Windlogger is potentially adaptable to other sensors and other applications because it is, at heart, a general-purpose logger with two pulse counter inputs and one A/D voltage input, normally used for registering wind direction;
Using the LeWL Windlogger
Using the LeWL Windlogger is very straightforward, just requiring a few set-up steps other than physically mounting the logger and anemometer:
- The logger needs a simple initial configuration step (assuming that changes to the defaults are needed), which is most easily achieved by linking the logger to the serial port of a PC, prior to installation in the field. But as an alternative, a text configuration file can be created and edited appropriately and placed on the SD card to be used with the logger;
- The anemometer cable is inserted through the weatherproof gland and its plug clicks into place in the RJ11 socket;
- Insert SD card and batteries into logger, confirm satisfactory operation from flashing LED and secure logger cover;
- Logged data is accessible as follows:
- Remove the SD card from the logger in between writes (ie when LED is not flashing) and insert into an SD card reader in a PC;
- Copy across the set of data files to a suitable folder on the PC;
- Reinsert the SD card into the logger and allow it to resume operation;
- Each individual data file contains one day’s (10 sec interval) or one month’s (1 or 10 min interval) worth of logged data in a simple comma-separated variable (CSV) text file with one record per line. This format can be readily imported into standard spreadsheet programs and the exact data format is shown in the logger documentation.